Chapter 4: Create Forms using Google Forms
In this chapter, you will learn how to:
- create forms
- add questions
- group questions into sections
- add conditional branching
- add text and video
Create Forms
With Google Forms, part of the suite of free Google Apps, you can quickly create surveys, quizzes, event registrations, just about any custom form, and store the responses with the form or in a Google Sheet. All Google files are stored online by nature, which makes it easy to share forms and invite people to respond. You can ask many types of questions, including radio button, checkbox, dropdown menu, fill in the blank, even required responses, in a clean, modern, easy to navigate design that your respondents will enjoy filling out.
- In a web browser, navigate to forms.google.com
You could also start a new form or work with an existing form from your Google Drive. Forms you create are saved to your Google Drive; double-click a form file to open and edit it. To create a new form from Google Drive, click the New button in the upper left and click Google Forms. - If prompted, log in to your Google account.
- Under the heading Start a new form, click Blank to start building a new form from scratch.
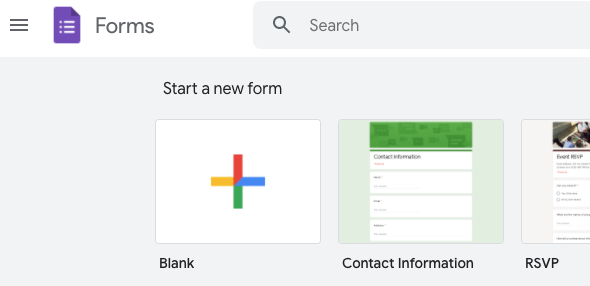
Alternatively, click one of the templates to get a head start on common types of forms.
Name the Form
- Click Untitled form in the upper-left to give the form a name. Type Cycling Survey.
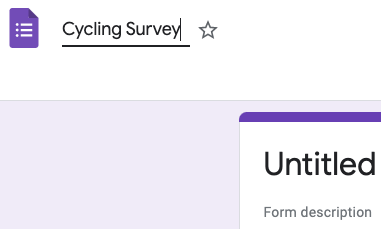
This is the form’s filename as it will be stored in your Google Drive. This filename will also be copied automatically into the Form title for your convenience, but you may customize the Form title if you wish.
Add Form Title and Description
- Click in the Form title field and type Company Cycling Program Initial Survey.
- Press the Tab key to move into the Form description field and type To promote cleaner living and environment, we are launching a Cycle-to-Work program and would like your input.

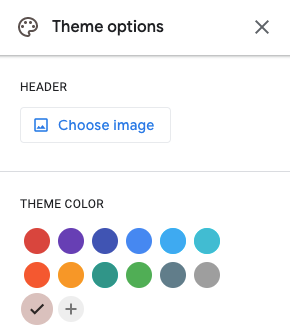
Choose a Design Theme
- Click the Customize Theme button in the upper-right of the window.

- In the Theme options pane that appears, click the Choose image button to add an image to the header of the form.
- In the Select Header window that appears, you may choose from numerous images on the THEMES tab, or click the UPLOAD tab to upload and use an image of your own. In class, we will upload the bike-wheel.jpg image from the Class Files folder on the Desktop.
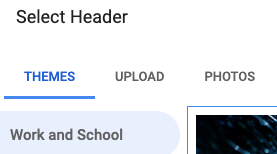
- Click DONE once you have specified a header image.
- Specify a Theme color. Notice how the Theme color palette adopted colors from your header image.
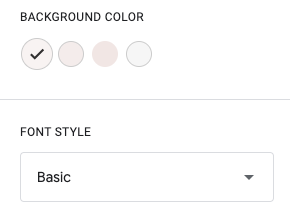
- Continue in the Theme options pane to set the Background color and Font style to your liking.
- When done, close the Theme options pane by clicking the X in its top-right corner.
Add Questions
A blank form begins with one question, and you may add more as needed.
- Click in the first question.
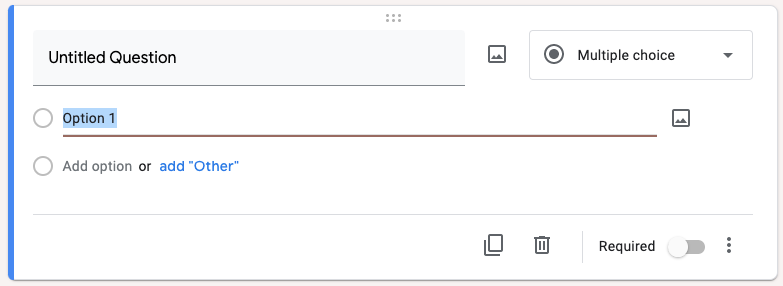
- Click on Untitled Question and type the question, Do you own a bike in good condition?
Immediately, several suggestions appear, including Yes, No, and Maybe.

- Click Yes, and then click No, to add those as the two possible responses to this question.
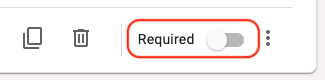
- In the lower-right corner of this question, click Required to make this a required question, i.e., respondents must provide an answer.
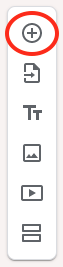
- In the toolbar floating to the right of the question, click the Add question button to add another question to the form.
- Type this question, Do you live close enough to make cycling to work safe and feasible?
- Add the Yes option, the No option, and make this question Required, as well.
Let’s say you decide that the distance question should come before all others. You may move a question up or down in the form by dragging it by its Move handle.
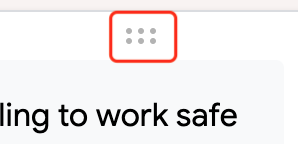
- Drag question 2 by its Move handle up above question 1 until the two questions swap positions.
- Click anywhere in the Do you own a bike question.
Group Questions into Sections
We can group questions into separate sections. By default, each section will appear in turn (sequentially) and present its questions, but you can infuse conditional branching based on how a question is answered, which we will do later.
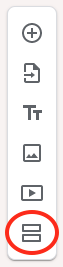
- On the toolbar, click the Add section button to add a section to the form.
- In Section 2 of 2, click Untitled Section and type Bike Owners.
- On the toolbar, click the Add question button to add a third question to the form.
The new question appears in Section 2 of the form. - Type this question, Would you need any of the following accessories to make cycling to work feasible for you?
As soon as you finish typing the question, the question type automatically changes to Checkboxes based on the wording in your question.
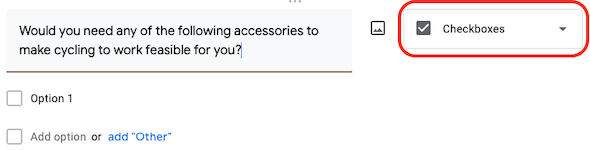
- Click Option 1 and type Helmet.
- Click Add option or press Enter/Return and type Front light.
- Click Add option and type Tail light.
- Click Add option and type Saddle bags.
- Click Add option and type Bike lock.
- Click add "Other".
- On the toolbar, click the Add section button to add a third section to the form.
- Type Loaner Bikes as the title of Section 3.
- On the toolbar, click the Add question button to add a new question into Section 3.
- Type this question, We can loan you a bike. What type do you prefer?
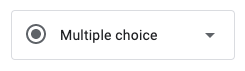
- Click the Question Type menu and choose Dropdown.
- Click Option 1 and type Mountain Bike.
- Click Add option or press Enter/Return and type Road Bike.
- Click Add option and type Cruiser.
- Click Add option and type Hybrid.
- Click the Add section button to add a fourth section to the form. Title the section Conclusion.
- Click the Add question button to add another question to the form.
- Type this question, What obstacles exist that might prevent you from cycling to work? Notice the question type changes to Paragraph automatically.
- Click the Add question button to add a final question to the form.
- Click the Question Type menu and choose Linear scale.
- Type the question, How likely are you to cycle to work at least one day per week?
- Change the 5 menu to a 10.
- Set the label for option 1 to Very unlikely.
- Set the label for option 10 to Very likely.
Preview the Form
You can preview a form at any time during development.
- In the upper-right of the window, click the Preview button.

The form preview opens in a new browser tab. - Answer the first two questions Yes and No, respectively.
- Click the Next button to proceed to the next section.
- Continue to preview a couple more questions, and then close the browser tab.
Add Conditional Branching
If respondents do not own a bike, we want them to skip Section 2 (Bike Owners), and be taken directly to Section 3 (Loaner Bikes). Likewise, if they do own a bike, we want them to skip Section 3 (Loaner Bikes).
- Scroll up and click in the second question of the form, Do you own a bike in good condition?
- Click the three vertical dots button in the lower-right corner of the question and choose Go to section based on answer.
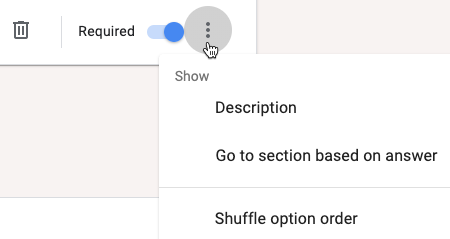
- Click the menu that appears to the right of the Yes response and choose Go to section 2 (Bike Owners).
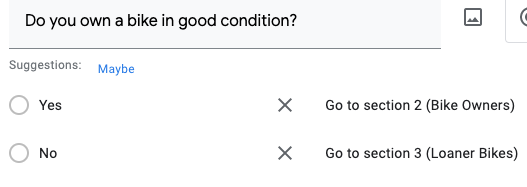
- Likewise, click the menu that appears to the right of the No response and choose Go to section 3 (Loaner Bikes).
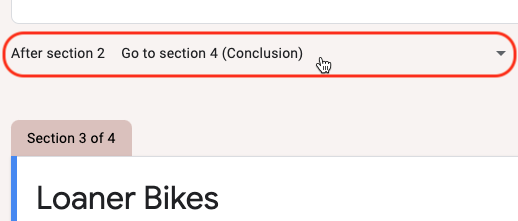
- Scroll down to the bottom of Section 2. From the menu After section 2, choose Go to section 4 (Conclusion).
- Preview the form again and test the branching.
- Close the preview browser tab to resume designing the form.
Add Text and Video
- Scroll to the bottom of the form and click in the last question, How likely are you to cycle....
- On the floating vertical toolbar, click the Add title and description button.
A new box appears at the bottom of the form. - Replace Untitled Title with Cycling to Work.
- In the Description field, type Let this brief video of cycling to work inspire you.
- On the floating vertical toolbar, click the Add video button.
- In the Select Video window that opens, click the URL tab.
- Type or copy-and-paste this YouTube URL: https://youtu.be/05b3Kt1LyAg
A preview of the video should appear shortly. - Click the Select button when done.
- Type a title for the video, Cycling to Work in Long Beach, California.
Our form is complete. Continue on to set where the responses will be stored and send it out.