Chapter 5: Send Forms and Process Responses
In this chapter, you will learn how to:
- create a Google Sheet to store form responses
- send links to forms
- view summary and detail reports
- halt submissions
- create a slideshow of response summary graphics
Create a Google Sheet to Store Form Responses
Before we send out invitations to fill out our form, let's specify where form responses will be stored. They will automatically be stored in the form itself, but in addition, we can create a Sheets file that stores them in a spreadsheet format, where the responses are easier to analyze and summarize.
- If necessary, open the form again.
- At the top of the form, click the Responses tab.

- Click the Create Spreadsheet - Link to Sheets button.
- Click the Create button to create a new spreadsheet, aptly called Cycling Survey (Responses), to store the data as it comes in.

The new spreadsheet is created, linked to the form, and opened. It contains a Timestamp column, and a column for each question. - Switch back to the browser tab containing the Google Form. You can close the Responses spreadsheet or leave it open, either way.
Send Links to Forms
Now we are ready to send our invitations to fill out our form.
- In the form, click the Send button in the top right corner of the window.

In the Send form dialog box that appears, you will see that there are three ways to invite people to your form.

- Send an email message directly from here
- Copy the URL of the form and paste it into whatever form of communication you prefer (email, text message, link on a website, blog, or forum post, etc.)
- Embed the form on a web page by copying the HTML code into a web page
- Click the Email icon, if it is not still the current choice, and enter one or more email addresses into the To field.
- Choose from the Collect email addresses dropdown menu if you want to gather the email addresses of the respondents, i.e., not anonymous responses.
- When ready, click the Send button.
The email is sent. Both it and the form have an elegant, responsive design, so they look great on desktop and mobile devices alike.
Settings
Click the Settings tab in the form to set many useful options about the form.
View Summary and Detail Reports
Once people begin to submit their responses, you can use the Responses tab of the form to monitor who has responded and how they answered the questions. You can also see the responses in the Google Sheet file you created earlier in this chapter.
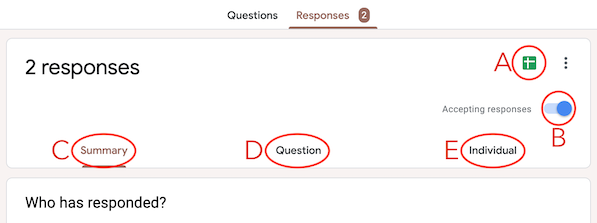
On the Responses tab of the form, you can:
- Click the View responses in Sheets button to open the Google Sheets file that is linked to this form. You could also open the Sheets file from your Google Drive where it is stored.
- Turn off the Accepting responses switch to end the submission period and halt the opportunity for users to fill out the form.
- View the responses to all the questions in a Summary, dashboard-style view.
- View the responses to one Question at a time.
- View the Individual responses, one submission at a time.