Chapter 2: Google Calendar
In this chapter, you will learn how to:
- schedule events, reminders and tasks
- subscribe to calendars
- create and delete calendars
- share a calendar
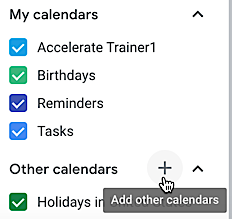
Google Calendar helps you manage your busy schedule by storing events, reminders and tasks in one or more calendars. You can also subscribe to other calendars like holidays or your favorite sports teams' schedules, and you can allow others to see and even manage your calendar for you.
View Your Calendars
To view your calendars:
- In a web browser, go to gmail.com or google.com.
- Click the Google apps button and click Calendar.
- If prompted, enter your Google account credentials.
Your calendars should appear. Watch the video below to learn how to:
- Make your calendar show one day, week, month, or year at a time.
- Use the Previous and Next buttons to move backward or forward in time.
- Click the Today button to navigate to the current date.
- Use the mini-calendar to navigate to other dates.
- Hide or show the events from any of your calendars.
- Click the Main menu button to hide or show the mini-calendar and calendar list.
Schedule Events, Reminders and Tasks
You can easily manage events, reminders and tasks on your calendar.
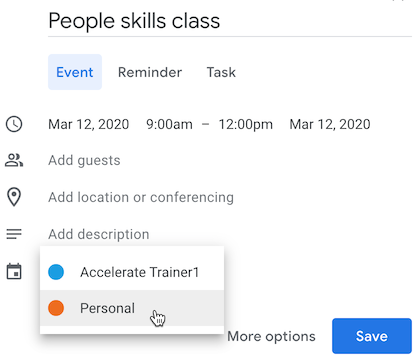
- To add an event, click the start date & time, or click and drag from start date/time to end date/time, and then enter the event details and click Save.
- When entering event details, you may convert the event into a reminder or a task by clicking the Reminder or Task button, respectively.
Each type of entry is automatically added to the appropriate calendar: reminders go into your Reminders calendar, tasks go into your Tasks calendar, and events go into your main calendar. - To reschedule an event, drag it to a new date/time.
- In Day view or Week view, drag an event's bottom edge to extend its length.
Subscribe to Calendars
There are many calendars of holidays and special interests, such as the national holidays of Barbados, or Ireland's cricket team schedule, to which you may subscribe. To subscribe to a public calendar:
- In the calendar list on the left, click the Plus sign button located next to Other calendars, and choose Browse calendars of interest.
- Scroll through the list of calendars, clicking a calendar's checkbox to subscribe to it, or the drop-down menu to expand the topic.
- After checking all the calendars you like, click the Back button located next to Settings to return to your calendars.
The subscribed calendars are added to your Other calendars list.
Create and Delete Calendars
In the same way that you can subscribe to calendars, you can create new calendars for yourself or your team to help organize events into logical groupings, such as Work and Personal calendars.
Create a new calendar
- In the calendar list on the left, click the Plus sign button located next to Other calendars, and choose Create new calendar.
- Type a name for the new calendar, enter a description, if desired, and click Create calendar.
- Click the Back button located next to Settings to return to your calendars.
The new calendar appears in alphabetical order under My calendars.
Once you have created an additional calendar, you will have the option of specifying a calendar when creating new events.
Delete a subscribed calendar
To delete a calendar to which you subscribed, simply unsubscribe. To unsubscribe from a public calendar:
- Point to the name of the calendar in the calendar list on the left.
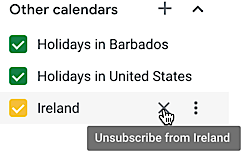
- Click the X button that appears to the right of the calendar name.
The calendar is not really deleted, in that others can still subscribe to it, but you will no longer see it or its events in your calendar.
Delete a created calendar
To delete a calendar that you created requires a few more steps, and is permanent; it cannot be undone. Also, you cannot delete your primary (default) calendar, but you can delete its events.
- Point to the name of the calendar in the calendar list.
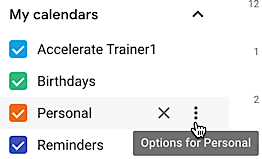
- Click the Options button (three dots) and click Settings and sharing.
- Scroll to the bottom of the page and click the Delete button located under the heading Remove calendar.
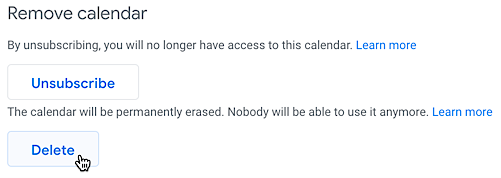
- At the warning that appears, click Permanently delete.
- Click the Back button located next to Settings to return to your calendars.
Share Your Calendars
You can allow other users to subscribe to your calendar to create shared calendars, and you control whether they can view, edit or manage the shared calendar.
To share a calendar:
- Point to the name of the calendar in the calendar list.
- Click the Options button (three dots) and click Settings and sharing.
- Scroll down to the Share with specific people section.
- Click the Add people button.
- In the pane that appears, add one or more email addresses of people with whom to share the calendar. Press Enter/Return after each email address.
- Click the Permissions menu and specify which permission level to grant these users.
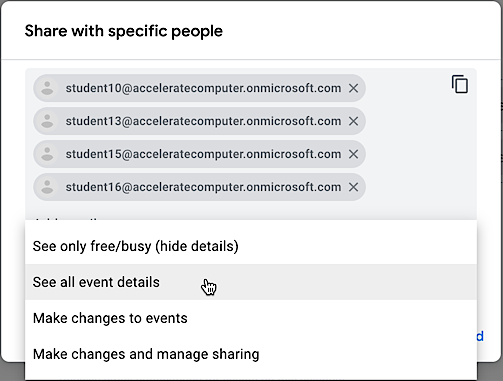
With this setting Users can See only free/busy - see events on your schedule, but no details
- not add, edit or remove events
- not change calendar settings
- not change sharing settings
See all event details - see events on your schedule, with details
- not add, edit or remove events
- not change calendar settings
- not change sharing settings
Make changes to events - see events on your schedule, with details
- add, edit or remove events
- not change calendar settings
- not change sharing settings
Make changes and manage sharing - see events on your schedule, with details
- add, edit or remove events
- change calendar settings
- change sharing settings, including denying you access
- Click Send to send an invitation to these users that will include a link to your shared calendar.
If a user does not have a Google account, an alert will appear asking if you want to invite them to create a Google account so that they can share your calendar. - Click the Back button located next to Settings to return to your calendars.