Chapter 1: Gmail
In this chapter, you will learn how to:
- compose and send email messages using Gmail
- create a signature
- receive and reply to emails
- manage attachments
- organize your messages with tabs and labels
- archive and delete messages
- search for messages
- manage your Google Contacts
Gmail is part of the Google Suite of web applications. It gives you the ability to send and receive email messages.
Create a Google Account
To use Gmail, you must first have a Google account. If you have not already created a Google account:
- Launch a web browser like Google Chrome or Microsoft Edge or Safari.
- Type google.com in the Address Bar and press Enter/Return.
- Click the Sign In button.
- Click the Create Account button and then follow the prompts to create a new account.
- Write down the email address and password that you create and store them in a secure place so you will not forget them.
Compose an Email Message
To compose an email message, log in to your Google account in a web browser or mobile app:
- Launch a web browser like Google Chrome or Microsoft Edge or Safari. (I recommend Chrome for maximum compatibility with the Google apps.)
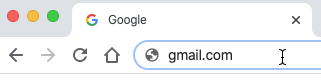
- Type gmail.com in the Address Bar and press Enter/Return.
- If you are not already logged in, choose or enter your account name when prompted.
- Likewise, enter your password when prompted.
The Gmail interface should appear. - Click the Compose button to begin a new message.
- In the new pane that appears, click in the To field and begin typing the first recipient's name or email address.
- If the desired recipient appears in a drop-down list automatically, click the name to complete the address. If not, continue typing the email address and press Enter/Return when done. You may add additional recipients to the To field. Some email servers limit you to about 50 recipients per message to prevent spamming.
- If you like, click Cc and/or Bcc and enter one or more recipients there, as well.
- Click into, or press the Tab key to move into, the Subject field and type a subject line for the message.
- Likewise, click into, or press the Tab key to move into, the Body field and type the body of the message.
The video below demonstrates how to perform these steps.
| Cc | Carbon copy recipients receive the message just like To recipients, but are not considered the primary intended recipients. |
|---|---|
| Bcc | Blind carbon copy recipients receive the message, also, but the other recipients do not know they received it. |
Format text in a message
Gmail supports rich text formatting (RTF) in the Body of email messages. To apply formatting options:
- Click the Formatting options button to show the formatting toolbar.
- Highlight (select) the text to format. You can either:
- drag through it in any direction, or
- double-click to select one word, or
- triple-click to select one paragraph.
- Do not try to select within highlighted text, because dragging will move the text to another part of your message. If you make a mistake, click the Undo button to undo it.
- Apply the desired formatting to the selected text.
- The buttons on the toolbar apply formats like font, size, bold, italic, underline and color.
- Depending on the width of your browser window, some of the buttons on the formatting toolbar may not appear. Click the More formatting options button to see those formatting buttons. They include align left, center and right, numbered and bulleted lists, and a few others, including a Remove formatting button that strips away all formatting applied to the selected text.
- Repeat steps 1—3 as needed.
Attach files to a message
You can send files via email messages as attachments or links. However, be aware of the types of files you attach, so as not to frustrate your recipients. Their device may not have a software app installed that can open your file. You can send PDF files quite confidently, because everyone has access to free software to open PDFs. Likewise, image files like JPEG, GIF, and PNG are safe because there are numerous apps capable of displaying images. However, if you send an AutoCad file to someone who is not an architect or engineer, odds are they do not own the AutoCad software, which is quite expensive, and will not be able to open or view your file.
Also pay attention to the size of the files you try to send. Google's email server limits the size of attached files to 25 megabytes (Mb). If a file you wish to send exceeds that limit, it will automatically be uploaded to your Google Drive instead, and then a link to its location will be inserted into the email message. The recipient(s) will be able to click the link to view it there or download a copy for themselves.
Files stored locally
To attach files that are stored on your local drive or network:
- Click the Attach files (paper clip) button.
- In the dialog box that appears, find and select the file(s) to attach.
- Click Open.
- Repeat steps 1—3 to attach additional files.
Files stored on your Google Drive
If the files you want to send via email are already on your Google Drive, you can send them either as a link, in the case of Google Docs, Sheets, or Slides, or as either a link or an attachment, for all other file types.
To attach files that are stored on your Google Drive:
- Click the Insert files using Drive button.
- In the dialog box that appears, find and select the file(s) to attach.
- Specify how the file(s) should be inserted; as a link to the file(s) on Drive, or as attachments.
- Click Insert.
- Repeat steps 1—4 to insert additional files.
Insert images inline
The methods for attaching files that we have shown you thus far do not display images in the body of the message. To insert an image file (JPEG, GIF, or PNG) into the body of the email message:
- Position the insertion point where the image should appear. It can be in a paragraph of its own or in one that already has text or other images.
- Click the Insert Photo button.
- If you previously uploaded the desired image(s) into Google Photos, then find and select the image(s) in the Photos or Albums tabs and click Insert. Otherwise, click the Upload tab and upload the image(s). The image(s) should appear at the position of the insertion point.
- If you click an image in the email body to select it, options will appear below the bottom left corner of the image to let you set the size (resolution) of the image to be sent, or to remove the image from the message.
Save or discard drafts
To prevent data loss in the event of a software or hardware crash or user error, drafts of your messages are continually and automatically saved as you compose them. If you are interrupted or you run out of time while composing a message and are not ready to send it, do not panic.
- To delete the auto-saved draft of the current message, click the Discard draft button in the bottom right of the New Message pane.
- To keep the auto-saved draft of the current message, just close the New Message pane by clicking the X in its top right.
To resume work on a saved draft:
- Click Drafts in the labels list on the left.
- Click the message in the message list to open it and resume editing.
Send an Email Message
To send the message you are composing or editing, click the Send button.
Undo a sent message
You have five seconds to recall a message before it is actually sent. In the small Message sent bar that appears immediately after you click Send, click Undo to cancel the send. You can increase that time limit to up to thirty seconds by following these steps:
- Click the Settings (gear) icon and then click the See all settings button.
- In the General tab, find Undo Send and choose a Send cancellation period of 5, 10, 20 or 30 seconds.
- Scroll down and click Save Changes.
View sent messages
Gmail keeps a copy of every message you have sent. To view your sent messages, click the Sent label in the list of labels on the left.
Create a signature
A signature is text that is automatically appended to the end of outgoing messages. You may create multiple signatures and specify when to use each. To create a signature:
- Click the Settings (gear) icon and then click the See all settings button.
- In the General tab, scroll down to Signature.
- Click the Create new button.
- Type a name for the new signature and click Create.
- Click in the space to the right and type your desired text.
- To create additional signatures, repeat steps 3-5.
- Under the heading Signature defaults, specify which signature to use for new emails and which to use for replies and forwards.
- Turn on the checkbox Insert signature before quoted text in replies... or else your signature will appear below the original text to which you are replying.
- When done, scroll down and click Save Changes.
Read Email Messages
New unread messages appear, by default, in bold at the top of your Inbox.
- To open a message, click it once. You may need to scroll down to read it all.
- To go back to the inbox, click the Back to Inbox button. The message will no longer appear bold, because you have read it.
Note: some messages may be categorized as Social or Promotions rather than appearing in your Primary inbox.
Reply to messages
To reply to a message:
- Open the message.
- Click the Reply button, either at the top right or at the bottom left. A small pane will appear.
- Type your reply into the pane.
- To review the original sender’s message, click the Show trimmed content button, which looks like three dots. Even if you do not, your reply will be added above the original text so your recipient can see the whole conversation, not just your reply.
- When ready, click Send, or to cancel and discard the draft of your reply, click the Discard draft button.
- Click the Back to Inbox button.
Receive attachments
If a message in the message list includes attached files, a button representing each attachment appears with the message.
- You can either:
- click the button representing the attachment to preview it, or
- click the message to open the message.
- If you clicked the button representing the attachment, you may look at the file as it appears in the browser (assuming the browser is able to display a preview of the attached file). You may also use the Open with buttons above the preview to save a copy of the file to your Google Drive and open it with a specified application.
- Alternatively, if you opened the message, each attachment appears as a thumbnail of the file. Point to the thumbnail to show two command icons:
- Click Download to save a copy of the file to the Downloads folder on your local hard drive.
- Click Save to Drive to save a copy of the file to your Google Drive in the cloud.
| Do this | If you |
|---|---|
| Preview the attached file | Do not need to edit the file or keep a copy for yourself. |
| Download the file | Need to edit the file alone (no other collaborators) or keep a copy for yourself. |
| Save the file to Google Drive | Need to edit the file with other collaborators or keep it long-term in a place where you can get to it from any device. |
Select Messages
The message list provides checkboxes for selecting one or more messages to act upon. You can manually check boxes, or use the Select column header to select multiple messages by type; All or None, Read or Unread, etc. This allows you to quickly affect many emails at once, to archive, delete, or apply labels, for example, to multiple messages.
Organize Your Messages with Stars, Categories and Labels
Gmail uses stars, categories and labels, rather than folders, to help you organize your messages. This provides more flexibility than folders, because your can apply multiple categories to a message, whereas you cannot put a message into multiple folders (without duplicating it, and you already have enough email messages, right?).
Initially, Gmail provides five categories and eleven system labels. You can create your own custom labels in addition to the eleven system labels.
| Categories | System Labels |
|---|---|
| Primary Social Updates Forums Promotions |
Inbox Starred Snooze Important Chats Sent Scheduled Drafts All Mail Spam Trash |
Categories
Categories appear as tabs across the top of the message list. Gmail automatically categorizes your messages into one of the five categories.
To specify which of the five categories appear as tabs:
- Click the Settings gear icon and then click the See all settings button.
- Click the Inbox tab on the row of tabs at the top.
- Use the Categories checkboxes to specify which categories to show as inbox tabs.
- Scroll down and click the Save button at the bottom of the window.
To move messages into a different category:
- In the message list, check the checkbox of the message(s) to move. Alternatively, open a message.
- On the toolbar above the message list, click Move to and then click a category.
To view the messages in a particular category:
- Click More in the list of labels on the left.
- Scroll down if needed, and expand the label, like Categories, if necessary.
- Click the label you want. Messages with that category or label applied will appear in this filtered message list.
Labels
Labels work like categories, except you create them, as many as you need. There are several ways to create new labels, even while applying labels to messages, like this:
- Use the checkboxes to select one or more messages in the message list. Alternatively, open a message.
- On the toolbar above the message list, click Labels. Next, either:
- Checkmark one or more labels, and then click Apply, or
- Type a new label and then click "Your label" (create new). A window will appear. If desired, nest this label under an existing one. Click Create when done.
Notice that the newly-applied label(s) appear as small buttons in the message list and as label indicators just below the subject when viewing the full message. To unapply labels from a message, either:
- Checkmark the message in the message list or open the message, click the Labels button on the toolbar above, uncheck the desired label(s) and click Apply.
- Open the message and then click the small x on the label indicator to be removed.
To delete labels:
- Click More in the list of labels on the left.
- Scroll down and click Manage labels.
- Use the Show, Hide, Remove and Edit links for any system labels, categories and custom labels as needed.
- When done, return to the inbox.
Removing a label also unapplies it from all messages, but does not delete those messages.
As an alternative method of applying labels, you can just drag a message onto the desired label in the Labels list to simultaneously apply that label to the message and unapply the inbox label from it.
Star a message
In the same way that you can mark a web page as a favorite to make it easier to find later, you can star a message. To star a message, click the star icon on the message.
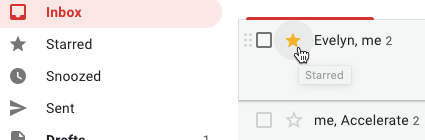
To view only starred messages, click Starred in the labels list on the left.
Messages that you star appear in Starred as well as in the Primary inbox tab. To make them not appear in Primary:
- Click the Settings gear icon and then click the See all settings button.
- Click the Inbox tab on the row of tabs at the top.
- Uncheck Include starred in Primary.
- Scroll down and click the Save button at the bottom of the window.
Archive and Delete Emails
Messages remain in your inbox until you archive or delete them, which you can do one at a time or en masse. The following table describes the difference between archive and delete.
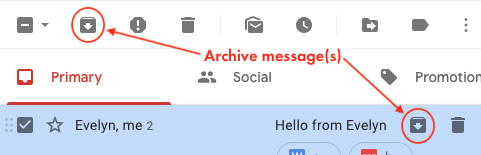
| Archive | To archive a message, select or open the message and click one of the Archive buttons.
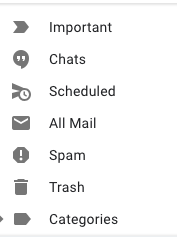
Messages you archive are not deleted; they are moved into All Mail. When you search your Gmail, your results will include messages that have been archived. Note: the All Mail label is added to every message automatically. If a message has been archived, you can find it in All Mail. To open All Mail, click More in the list of labels on the left, scroll down through the list, if necessary, and then click All Mail.
To move an archived message back to the inbox, select or open it and then click the toolbar button Move to inbox. |
|---|---|
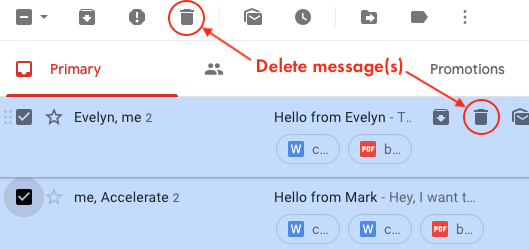
| Delete | When you delete a message, it stays in your Trash for 30 days. After that, it will be permanently deleted from your account and cannot be recovered. To delete a message, click the Delete icon that appears when you point to the message. To delete several messages at once:
Deleting a message applies a label to it that makes it appear in Trash rather than in Inbox. To recover a deleted message:
|
Search for Messages
You can search messages in your Inbox, Sent, or All Mail by sender, recipient, date, size, or other criteria. To search for messages:

- In the Search mail box at the top of the message list, type what you're looking for and press Enter/Return. To help you search faster, Gmail suggests search terms as you type. These search terms are based on information from your Gmail account like existing messages, contacts, labels, or past searches.
- On the right side of the Search box, click the Down arrow menu to show search options with more ways to search.
Gmail will not show messages from Spam or Trash in your results.
Search operators
You can use certain words or symbols called search operators in the Search box when searching for messages. Consult Gmail's help for the complete list, but here are some examples.
| This search expression... | Will find messages... |
|---|---|
| from:amy | from Amy |
| from:amy OR from:david | from Amy or David |
| subject:dinner | with dinner in the Subject line |
| label:travel | that have the label travel applied |
| category:social | in the social category |
| is:important is:starred is:read is:unread |
that are marked important that are starred that have been read that are unread |
| after:2019/04/16 before:2019/04/16 |
sent after April 16, 2019 sent before April 16, 2019 |
| newer_than:3d newer_than:1m older_than:5y |
sent within the last three days sent within the last month sent more than five years ago |
Manage Your Google Contacts
You can store contact information of the people you send mail to in Google Contacts. To open Google Contacts from Gmail or anywhere else in the Google suite, click the Google Apps button and choose Contacts. A new tab opens with your contact list.
To create a new contact:
- Click the Create contact button.
- Fill in all the details you need and click Save.
- Close the contact pane that appeared.
The Contacts list works similarly to Gmail's message list. You can select multiple contacts using the checkboxes, search for contacts, apply stars and labels, delete contacts, and more. Click an email address to instantly begin a new message addressed to that person. And of course, when addressing messages in Gmail, your new contact will appear in the drop-down list when you type some of their name or email address.